More Student Help

Printers

Lab


Printing Problems

BAS LAB Print job not printing

This can be caused by several things:

  1. Check that the client computer is connected to the network. Go to " My Computer" and verify you can access the network drives (S:) from My Computer. If not, select Shutdown | Restart. Make sure you see the login script executing and you have access to the network drives.

  2. Verify Printer is installed. Go to " Start" | " Settings", "Devices", " Printers and scanners" and make sure the printers are listed. If not, contact a graduate assistant or lab director to re-install the printers. Put an " Out-of-Order" sign in the computer and fill the Equipment Problem form and place it on GA desk.

  3. Make sure the client computer has enough free disk space, at least 100MB. If not, restart computer for all settings to be restored.

  4. Make sure printer is online and connected. Go to the printer, verify the printer is online and is connected to the network (check power and network cables). Try printing from other computer, if it works Ok, then the problem is in the client computer - place out of order sign in computer.

  5. Is the printer Offline?. If everything checks ok, the problem may be that the printer was put "offline" on the lab assistant desk. Go to Control Panel, "Printers", right click on the printer, make sure the the "Use printer Offline" is not checked (only in labs E, F)

Applications

Lab PC S: Drive Access

All computers in the master classrooms and in the computer lab has direct access to the S: drive as a local drive. 

PowerPoint print 6-slides/ page

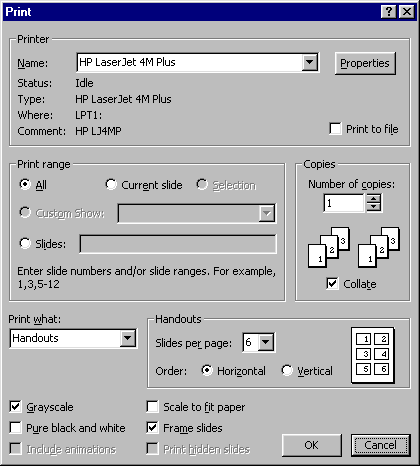
Make sure you print six slides per page when printing PowerPoint class notes from the s: drive. To to this use the File | Print, then select "Handouts" under the "Print what" section, select 6 slides per page. Make sure to select the correct destination printer before printing.

How to use the scanner

The scanner is located at the ADA computer desk area in the north side of the BAS Lab. We limit the scanning to a "reasonable" number of pages. We do not scan complete books as that would take too long. Faculty members normally use graduate assistants to scan several pieces of material.

To scan documents to Word, use the TextBridge Pro icon on the desktop. To scan follow this steps:

  1. Place material - one or more pages- on the flat surface of the scanner. Align it properly. Close scanner.
  2. Run the TextBridge Pro software.
  3. The TextBridge Pro main screen will display. There is a series of buttons at the top of the screen:
    • The [AUTO] button to do a one click scan,
    • Step 1, selects the source. It should show a picture of a Scanner.
    • Step 2, scans the text in the page(s)
    • Step 3, selects the output. It should show a logo for MS Word ( W ).
  4. Click on [AUTO]
  5. The scanner will scan the document, you need to select the text area and then select, FileReturn to TextBridge Pro.
  6. The program will return to TextBridge Pro and show the page just scanned within a small window.
  7. You have three options:
    • [Done] if this is the only or last page.
    • [More Pages] if there are more pages for this document
    • [Cancel] to Cancel
  8. After you scan all your pages, click on [Done]. The program will scan the text, and then it will open MS Word with the text on it.
  9. In Ms Word, select File, Save As to save this document.

To scan pictures, click on the HP Director icon on desktop

  1. Make sure HP Scanner XXXX/XXXX is selected on the device box.
  2. Click on Scan Picture button
  3. Wait until the HP Scan Manager appears - make any changes you may want
  4. Make sure the dotted line cover all the area of the document you are scanning.
  5. Click on Accept.